Batch
![]() The "Batch" script is designed for processing multiple images automatically. On the launch, the script opens the dialog box shown on the screenshot.
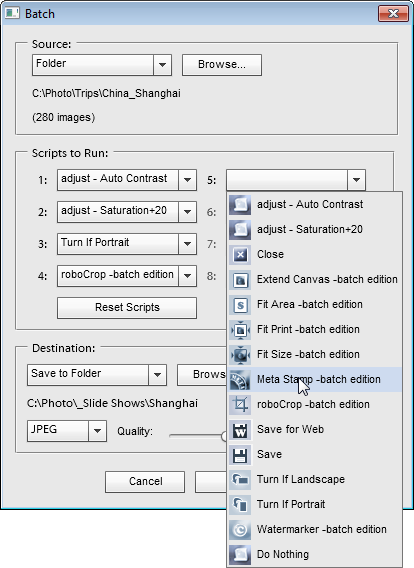
The "Batch" script is designed for processing multiple images automatically. On the launch, the script opens the dialog box shown on the screenshot.
1. First of all, you define, in the drop menu of the "Source" area, which files should be edited -- all the currently opened documents (Open Files) or a whole folder with images (Folder). The latter option opens a dialog for choosing the source folder.
2. Then, in the menus of the "Scripts to Run" area, select one or more scripts that you wish to execute.
If you need to disable a selected script, choose "Do Nothing" item instead. To clear all the fields and set up a new script sequence, click the "Reset Scripts" button.
Please note that the menus only include scripts from "Batch Optimized" category of the E+ catalog.
If you wish to batch-play a script from a different category (e.g., "Commands"), first copy it to the "Batch Optimized" folder by using the "Add to Batch" ![]() button in the "Scripts" dialog. For example, on the screenshot, you can see two additional commands - "Auto Contrast" and "Saturation+20".
button in the "Scripts" dialog. For example, on the screenshot, you can see two additional commands - "Auto Contrast" and "Saturation+20".
To batch-play an action (Photoshop macro), load it into the Actions panel and then add it to the "Batch Optimized" category of the Scripts catalog with "Action to Script" tool.
3. In the "Destination" area, you decide what to do with the edited images -- export to specified location (Save to Folder) or not to save and leave the documents opened (None). The "Save to Folder" option lets you specify the output file format and other saving options.
4. At last, click "Run" button to launch the batch processing.
Please note, that when you click "Run", the "Batch" dialog remembers all your settings. If you need to save the current settings without processing images, just click the "Save and close" ![]() button.
button.
![]() A video-tutorial on this topic is available here.
A video-tutorial on this topic is available here.